Monday, August 30, 2010

Basil, Brown Sugar and Peaches

So just writing that makes my mouth water. Two things we have in abundance just now, that I might not have thought to put together only I was looking for a recipe to adopt for the Adopt a GF blogger event and saw this on Shauna's site, Gluten-Free Girl and the Chef. Seems she loves the Wednesday NYT almost as much as we do around here: this one originated there. I think it is a beautiful thing that these recipes get new life and sometimes new tricks when they are spun up for another time around on the web, though this one needs no spinning at all to be absolutely fabulous. Just look!


Peaches Roasted with Brown Sugar and Basil

3 Tablespoons of unsalted butter, softened 
3 Tablespoons dark brown sugar
2 teaspoons chopped fresh basil
pinch of cinnamon
pinch of salt
4 ripe peaches, halved and pitted

Preheat oven to 425 degrees.
In a small bowl, mash together butter, sugar, basil, cinnamon and salt. Spoon mixture into cavities of peaches.
Bake until the peaches are soft and butter is bubbling, about 15 minutes.


Thanks Shauna.


Enjoy!

Thursday, August 26, 2010

Corn Sweet Corn

We are inundated by corn. Every 1/2 mile down the road there is a hand-lettered sign, on plywood and painted in red spray paint: "FRESH CORN". Four dollars buys a baker's dozen, and the locals know to select the smallest ears, as they are the most tender. The real picky peel back the husk of each ear before it goes in the bag, to make sure it is light in color, with small, crisp kernels.


Around these parts, the stars are heirloom varieties, Butter and Sugar, and, later in the season, Silver Queen. In line at the Post Office folks compare corn stand notes. Some farmers sell from bushel baskets on the side of the road, some are pre-fab log fancies (these usually also feature pies and jellies, and sometimes even fresh flowers), others are shacks hastily thrown together with boards and nails. The man down the road just completed a large, well-crafted shed for his corn stand, and decorated it with pumpkins. But everyone knows it is not the shack that determines the corn, it is the field. And, the variable from year to year: the weather.

Now that's fresh from the field!

I am not kidding about this. Sometimes, we buy a half dozen from different corn stands, to compare.

Corn is serious business.


(This corn color is just about perfect, but the kernels are a little too big and puffy.)
We also eat our corn down the row, not around. Once, when I had just met my husband, we were at a party and I was saying, incredulously, that he ate corn not in a row but a -- "you mean like a mo-ron?" interjected a very Southern friend. I neither confirmed nor denied.

Of course, all this corn snobbery earns us a lot of uneaten ears. We freeze it, fry it, put it in chowders, relishes and salads. But the star turn for the unused corn is the pudding.

We've tried many, and this is the recipe we always come back to, one of Ina's, tweaked to our own taste. But we've also collected many more, and one day will knock them off, one by one, with tasting notes. Until then ..


Corn Pudding
Adapted from Ina Garten

1/4 lb. (1 stick) unsalted butter
5 cups fresh corn kernels off the cob (6-8 ears)
1 cup chopped yellow onion (1 onion)
4 extra-large eggs
1 cup milk
1 cup half and half
1 cup cottage cheese, pureed in a food processor
3 tablespoons chopped chives and garlic
1 tablespoon kosher salt
3/4 teaspoon fresh ground pepper
1/2 cup cornmeal
3/4 cup grated extra-sharp Cheddar, plus extra to sprinkle on top

Preheat oven to 375 degrees. Grease the inside of an 8- to 10- cup baking dish.

Melt the butter in a very large saute pan and saute the corn and onion over medium-high heat for 4 minutes. Cool slightly.

Whisk together the eggs, milk, and half-and-half in a large bowl. Slowly whisk in the cottage cheese. Add herbs, salt and pepper. Add cooked corn mix, cornmeal and grated cheddar, pour into the baking dish and sprinkle the top with more grated cheddar.

Place dish in larger pan and fill bottom pan halfway up the sides of the dish with water. Bake pudding for 45 minutes until top browns and knife inserted into center comes out clean. Serve warm. Serves 8.

Enjoy!

Monday, August 23, 2010

Peaches and Cream

When the peaches came in in July (early for this far North NYS) we'd buy a basket and savor it for days. Now, though, they are ripe on the shelf, and need to be separated and consumed as fast as we can. We  take them outside, stripping the shirts off the small ones so that the peach juice doesn't stain their clothing (if anyone knows an antidote for peach juice, please share) and holding our chins away from our chests as we bite in.


Still we can't stop eating them. Whole, cut and peeled, in cereal, pancakes, ice cream, or topped with Greek yogurt and coconut. They are so good fresh we haven't bothered baking with them -- until now, as they ripen by the tens on the counter.

So as a parting gift to my step-daughter, who reads this blog from her food-challenged University with her stomach growling, I made a peach pie, her request. The addition of the cream and cornstarch make a smooth base for the peaches, and the crust is infused with creamy almond flavor as well. Make ahead long enough to cool most of the way, and the crust can harden up like a crumbly cookie.

Peaches and Cream Pie

crust
1 package Mi-Del pecan shortbread
1/4 cup browned butter

filling
8 ripe peaches
1 teaspoon almond extract
3 Tablespoons rice flour
1/4 cup cornstarch
1/4 cup heavy cream
1/2 cup sugar
pinch of salt

In a small metal pan, melt the butter and cook until brown foam forms on top; off the heat if any solids begin to separate. Whiz cookies in a food processor and add butter. Pack into 9-inch pie pan.

Bring a large pot of water to boil and drop the peaches in for 1 minute each, this will make the skins slip off as easy as Hugh Hefner's panties. Working over a large mixing bowl to catch the juice, slice peaches in 1" wedges to the pit and discard the pits. Add the rest of the ingredients and bake at 400 degrees for 55 minutes. Check the pie towards the end of the cooking time and if the crust is browning too fast make a small rim of aluminum foil to protect it from direct heat.

Enjoy!

Friday, August 20, 2010

Lighthouse Steakhouse

Sometimes, in summer, if you have a good butcher, all you need is a steak.

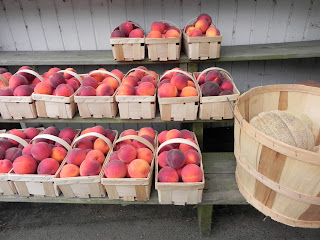
Luckily, we do. Just down the road is a little market called the Lighthouse. It is legend around here, for its fresh meat, home-baked breads -- banana or zucchini bread that crisps up when toasted and hit with butter -- and the piles of fresh produce that farmers deliver each morning. Corn in the bushel by the door, baskets of ripe peaches on a makeshift well-weathered shelf that has, by some miracle, been bearing its sweet load as long as I can remember.


The market is pervaded by the smoky smell of roasting chickens, for the Lighthouse had a rotisserie long before Whole Foods and Harris Teeter decided it was trendy, and they occasionally throw on a brisket, or a turkey, for good measure. At lunch the line for fresh-made subs is a community sounding board. And if, when you are paying, there is a bunch of asparagus, or a basket of yellow plums, by the checkout, grab them.

But the star here is meat. People from places far closer to "civilization" (ie bigger and more plentiful markets) come here with coolers when their summer stay comes to an end, to load up on Norm's flank steaks and NY strips, perfectly trimmed filets and tender  ground beef, not too fat nor too lean.

All you need is salt, and a grill, and you've got a meal.


Grilled Filet Mignon

The filet is the most tender cut of meat, as it is taken from a non-weight bearing muscle in the cow that is rarely exercised. It is also the most expensive, as there are only 4-6 pounds in the average beef; you can use this basic method for any cut of steak.

Choose steaks that are 1-1/2 inches in thickness. Bring them to room temperature by taking them from fridge 45 minutes before cooking.

Fire the grill up to hottest possible temperature. Using tongs, put meat on the grill and leave it at least two minutes to sear in the juices. After about 5 minutes, flip; longer for medium or well. Test the steak after a couple more minutes; purists hate to pierce or poke meat so use the thumb test instead. A thumb in a rare steak will leave an indentation; if medium will give but leave no mark, and if well will be firm. If you use a thermometer (we do) grill to 130 degrees for rare, 130-140 for medium-rare, 140-155 for medium, 155 to 165 for medium-well, 170 plus for well.

Purists also extol the virtues of salt at the end of the process, saying it bleeds the juices if applied before grilling. Let the meat sit at least 5 minutes to let the flavors develop.


Try this easy mushroom to ground the plate, and you've got a steakhouse at home. The Portobello is the filet mignon of mushrooms, a grown up crimini, dense and meaty.

Portobello Stuffed with Spinach
serves 4

4 Portobello mushrooms
1.5 lbs spinach, fresh
3 cloves garlic, slivered
salt and pepper
1 Tablespoon olive oil
1/4 cup pine nuts, toasted (I use a toaster oven: spread on the sheet and spray with olive oil, toast until golden, about 5 minutes.)

Heat olive oil in a heavy skillet and add garlic. Cook until golden. Add spinach in handfuls -- it will wilt and as it does, stir up the garlic to combine.

When spinach is completely wilted, take a slotted spoon and fill tops of cleaned Portobello mushrooms.

Sprinkle pine nuts on top and bake at 350 degrees for 20 minutes, or until mushroom is tender.

Enjoy!

Wednesday, August 18, 2010

Pickles, sweet and sour

This summer has been wonderful for produce: the warm, rainy New York State spring made everything pop early, the flavors rich and pure. From the Amish families that trot their offerings to the farmers' market, we procure crisp Romaine, corn still warm from the field, and this year, small pickling cucumbers, which my mother has been pickling every which way.

My mother has not always made pickles. Growing up in Indiana, there were always homemade pickles in her Mother's refrigerator, gifts from neighbors or bought at the fair. Corn, onions, radishes, cucumbers, cauliflower, anything from the garden was fair game. Here, pickles sold at the summer farmer's market were mostly canned. About five years ago, she saw a recipe in the paper for dill pickles, and it looked easy. That first batch attracted kids in our house like her canister of M 'n M's (ok, not quite, but still, for a small, sour, crunchy vegetable, they go well here).


Homemade Garlic Pickles
5 lbs. pickling cucumbers
1/2 gallon and 5 cups cold water
1 1/3 cups kosher salt
2 T mixed pickling spices (available in the spice section of your supermarket)
4 cloves garlic, unpeeled
2 large sprigs fresh dill
2 cups apple cider vinegar
2 T sugar

Wash cukes well. Put in glass or stainless bowl. Combine 1/2 gallow water and 1 cup salt. Stir until dissolved. Pour over cukes, cover and let stand overnight.

Drain and rinse cukes and discard brine water. Pack into clean gallon glass jar along with spices, garlic and dill.

Combine remaining 5 cups water, 2 cups vinegar and 2 T sugar. Bring to a boil and pour over the cukes.

Cool, cover jar and refrigerated. Pickles are ready to eat as soon as they cool, but better if left overnight. Will keep in fridge to 2 weeks.

Traditionally, our summer fridge contains a tall canister of dills, but this summer, with the cukes so plentiful, she's been experimenting with varying degrees of sweetness. We weigh in as they ripen, spooning them out of the jar into dishes for lunch, snacks and dinner.


This summer, the sweet pickle recipe is the winner, large praise from my mother, whose motto is: "I never met a pickle that I didn't like."

Sweet Refrigerator Pickles
7-8 cups thin sliced pickling cucumbers (3 lbs.)
1 sliced onion, big
2 sliced peppers, red green or yellow
1/8 cup salt
1 cup vinegar
1 cup sugar
1 tsp celery seed
1 tsp mustard seed

Place vegetables in a bowl and sprinkle with 1/8 cup salt and cover with ice water -- leave for 2 hours.

Drain and place in jars. Boil vinegar and rest of ingredients and pour over pickles. Store in fridge for up to two weeks.

If you can keep them around that long!

Enjoy!

Saturday, August 14, 2010

How to Roast a Lamb

I have a friend who loves cookbooks the way other women love new clothes. She falls for one fast, bringing the conquest into her kitchen and making it at home, fawning over its pictures and marking promising recipes with Post-Its. She brings it to tea and boasts of its merits, even leaving it for a while if she is not cooking something from it that very night.

So needless to say, when she champions a book it is very hard not to fall for it too.  Such was the case with Michael Psilakis' How to Roast a Lamb, which I had to buy myself as the first week she owned it, as she brought it over to share what she was currently cooking, then left with it as there were too many tempting dishes to try to leave it even for an hour. After two minutes with it, I was hooked.

Psilakis is Greek, a culture for which I have a tremendous penchant. His father, when they left their native land, brought seeds from the family garden which he perpetuates year after year. When a food is fresh and growing, that is the best time to eat it, seems his philosophy, and so finds simple yet enchanting new ways to keep the food central. He doesn't obscure with too much technique, lengthy ingredient lists or precious spices. Yet to survive in the Manhattan restaurant scene, he must spin tradition into his own generation. These are all foods we know of and love, prepared as his mother taught him, and beyond.

I started with the eponymous recipe; there will be more in these pages as time goes on. The night I made this we had a dozen for dinner, a common summer occurrence, so I doubled the size of his lamb leg, but had plenty of stuffing. We still had left overs, which made killer panninis when pressed with melted sharp cheddar.


Roasted Leg of Lamb
adapted from "How to Roast a Lamb"

Stuffing
1.5 cups large, sun-dried tomatoes, roughly chopped
1/4 cup oil-cured black olives, pitted
1 teaspoon minced rosemary
leaves from 3 small sprigs thyme
1 teaspoon dry oregano
1 Tablespoon Dijon mustard
15 cloves Garlic Confit (recipe follows)
3 Tablespoons olive oil
1 1/2 Tablespoons red wine vinegar
cracked black pepper

Lamb
5 lbs boneless leg of lamb, butterflied and some fat trimmed off
kosher salt and black pepper
olive oil
1 1/2 cup water
1 Tablespoon Dijon mustard
2-3 cloves Garlic Confit
3 large sprigs rosemary
3 tablespoons olive oil

Combine all stuffing ingredients in a food processor and puree to a smooth paste, about 1 minute. Reserve about two Tablespoons of the mixture.

Lay the lamb out with fat side down. Season with salt and pepper and spread stuffing mixture over it, pressing it down in all the cracks and crevices of the lamb. Drizzle with olive oil and roll the lamb up, seasoning with salt and pepper as you go. Wrap a string around the lamb several times and tie off, or tie in 3-4 spots crosswise and 1-2 lengthwise. Ideally allow the meat to sit on a rack in the refrigerator over night, to allow the  flavors to develop.

Bring lamb to room temperature while preheating oven to 375 degrees. In a small roasting pan, whisk reserved stuffing, water, mustard, garlic and rosemary. Place a rack in pan over the liquid. Season lamb with salt and pepper on all sides. In a large heavy skillet heat oil to very hot, then sear lamb well on all sides.

Roast seam side up over pan liquid, basting every 15 minutes. When the meat is medium rare, a thermometer inserted at the thickest point will register 140 degrees. Let meat rest for 15 minutes. Use pan juices for saucing, or peel and half some roasting potatoes in the pan and roast while meat rests.

Garlic Confit
3 cups garlic cloves, peeled
2 bay leafs
8-10 sprigs fresh thyme
salt and pepper
2 cups oil

Put cloves in a heavy, covered braising pan, add bay leaves, thyme and a scant tablespoon sea salt, 15-20 black peppercorns. Barely cover with the oil. Cover and braise in 300 degree oven until pale golden and tender, about an hour. Cool to room temperature. Keep in jar in fridge and use liberally in sauces, vinaigrettes, on vegetables and sandwiches.

Enjoy!

Tuesday, August 10, 2010

The Beautiful South

I have heard that some people dispute that Virginia is really the "South," but I, who have lived everywhere but before moving here, beg to differ.

Case in point, a dinner party we went to recently. Some friends had gone down to Mississippi to hunt, and brought back a mess of quail to cook up. (208, to be exact.) These guys have been shooting together since boyhood; they join another friend who's moved further south for a weekend hunt each year. The quail are dressed and frozen and toted home in bags for a party.


This summer, they set up a skeet shoot down at a pond on their farm, far enough from the house to be safe, but within audible range. It was 100 degrees that day, but merely a precursor to summer. Those not shooting gabbed on the veranda sipping ginger margaritas and cranberry refreshers to the sound of gunfire, while the others went back and forth in pickups and mules to shoot.


Seemed pretty Southern to me.

At the end of the day, all 208 quail, plus the odd steak, were put on the grill, having been marinated with olive oil, whole garlic and jalapenos. Salad, tomato pie and Silver Queen corn, the first of the season, straight from a Delaware field.

We sat at the long table, sucking juicy meat off  bones best picked up with fingers made tangy from the garlic and jalapeno, washing it down with red wine, jabbering long into night. When we were full, trays of dark chocolate, dried apricots and walnuts appeared, along with cherry and peach pie.


One of the longest nights of the year, well spent.


Grilled Quail

Olive oil
Jalapenos, cleaned and sliced
whole peeled garlic cloves
salt and pepper
Quail, 2-3 per person, dressed

Marinate quail in the other ingredients, preferably over night. Grill on a medium grill until skin is golden and internal temperature reaches 160 degrees, 5-7 minutes a side.

Enjoy!